Happy Holidays! Celebrate the season on your Facebook page with our holiday Facebook Cover Photo Template featuring Miss Birdie’s Christmas friends. We’ve left a space on the Photoshop template for you to add you own custom holiday message. You can also “turn off” the social icons, if you prefer just festive lights! Please enjoy our gift. We wish a joyous holiday season!
You’re sitting in front of the television, watching your favorite reality show and checking your laptop to see what your Facebook friends are up to. Scrolling through the 20 notifications Facebook has for you, you notice that 5 or 6 of them are from friends inviting you to play Texas HoldEm or Farmville. But you don’t want to play Texas HoldEm or Farmville. You want to watch your favorite reality show and post status updates about what flavor popcorn you’re eating.
Without a doubt, Facebook game requests have clogged up our notifications more than ever over the past several months. If you are not a gamer and don’t want to play any of the thousands of games on Facebook, then you may want to block the Facebook game invitations your friends send you. This doesn’t mean you don’t like your friends, and it doesn’t mean that 251 million people aren’t playing games on Facebook. It just means you don’t want to play and you don’t want to be requested to play. And that’s okay.
There are a couple ways to disable Facebook game notifications. The easiest and fastest way is shown below.
Note: Once game notifications are disabled, they will not show up on your smart phone either. But, I have not been able to actually use my iPhone to disable Facebook game requests in the first place. If anyone can shed light on this, please share with us in the comments below. Meanwhile, follow these instructions on your computer, not on your smart phone.
To Block Facebook Game Requests from Showing Up in Your Notifications:
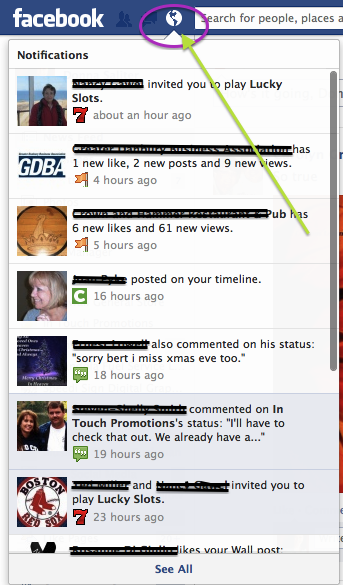
Click on your notifications icon to show the list of notifications.
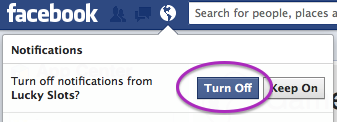
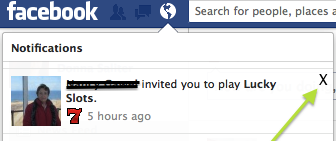
Find the game notification that you’d like to disable. Hover over the “X” in the upper right-hand corner. You should see the words “Turn Off.” Click on the “X.”
Facebook will then ask you: “Turn off notifications from ‘Lucky Slots?’” (or whatever the name of the game is). Click “Turn Off” to block the notifications for this game. Or, click “Keep On” if you change your mind and still want to get invitations for this game.
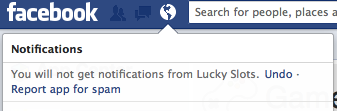
Facebook will confirm with you by saying, “You will not get notifications from Lucky Slots.” You can undo the action at this point if you change your mind. But keep in mind that after this point, you will not be able to undo your disable, because currently Facebook does not have a “disabled app” page for you to “undisable” the apps you’ve blocked.
A few weeks ago our colleagues over at Artizon Digital wrote a blog article about copyright infringement and how to avoid it. We thought we’d elaborate on author Sue Surdam‘s “Miss Manners'” style article and show you how to protect your website content when someone else steals it.
In the article, Sue gave her audience tips on polite ways to share others’ content on their own blogs. Referencing an article from HubSpot’s own Corey Eridon, Sue advises: “When quoting another author in your post, polite behavior includes listing the author’s name, link to their website or to their source article.”
Sue goes on to advise readers how to cite social media content, and finishes with how to share images: “Images are copyrighted as soon as they are created. Either contact the creator for permission to use the image or limit your image use to Creative Commons images.”
After reading Sue Surdam’s sage advice, we wondered how many of you might want to protect your website content against people who are not as polite as Sue’s audience: people who may steal your articles or photos. Has this ever happened to you?
We were reminded of a Google+ post from Mark Gittelman, master mechanic, online marketer and website developer from Florida. One of his articles, along with the image he owned, was copied and pasted verbatim into a blog for an auto shop in New York. We were prompted to call Mark and ask him about his experience.
Case Study: What to Do If Someone Steals Your Content
Mark Gittelman ~ Master Mechanic, Website Builder, and Blogger
Mark Gittelman is an ASE Certified Master Technician. He was an active mechanic for 25 years before turning to the Internet for a new revenue stream. He created blogs showcasing his auto repair expertise and developed a readership that grew into a sustainable business where he sold related advertising to automotive companies. He also branched out and created a site that shares what he’s learned over the years about web development and search engine optimization. This is his story.
All businesses recognize the need to have a website. After launching it they soon realize they need quality content. Some of the more unscrupulous companies might shoot for a shortcut using Google keywords like the above-mentioned New York auto repair shop did. They typed in “common auto repairs” and found Mark’s article. They copied and pasted the complete article onto their website along with his photo and links to other related resources. These links triggered a pingback to Marks WordPress dashboard informing him that another site linked to several of his pages.
This is a feature built into the WordPress platform. When Mark followed the ping to see who it was from he found his article and pictures had been stolen: copied and pasted verbatim onto the New York auto repair shop’s website.
Mark is said to be relentless when someone outranks his original article with copied information; he’ll stop at nothing to take it down. He always starts with directly contacting the people who posted his material and politely asking for removal before taking the next step and contacting the webhost. In this case he called the repair shop during business hours and spoke directly with the owner. The business owner stated the content was theirs and refused to take it down.
Step 2 to Protect Your Website Content: Call the Host Provider
The second step is to call the company that hosts the website that stole your content and report the stolen content. Tracking down the hosting company and the actual owner of a site can be done through various whois database websites like Domaintools.com. This is not always successful in finding the owner because people have the option to pay an extra fee and remain hidden from the public records database. It is, however, required by ICANN (Internet Committee for Assigned Names and Numbers) – the Agency that oversees the use of Internet domains – that the hosting company provide contact information.
In this case Mark moved on to step 2 using the Digital Millennia Copyright Act (DMCA) to notify the web hosting company of the violation. You can get blank DMCA forms on the Internet but Mark recommends checking with the hosting company before you get started. Most major hosting companies have defined procedures to follow in filing a DMCA complaint form. Although the forms may be slightly different in layout, most cover the same important points. These include:
Where are the infringing materials and the discovery date?
Where the original content is located and when was it first posted?
Who owns the copyrighted content?
There is also a comment box so you can provide details about the situation. Mark recommends keeping the comments down to a minimum of no more then 2-3 sentences. He also pointed out that some hosting companies are very helpful and resolve the issue quickly and others do not. Properly completed DMCA forms will require a handwritten signature from the original author, certifying that submitted information is accurate and truthful.
Proving the Content Is Yours
Content can be hard to dispute if there isn’t anything unique about it. In the case referenced above this was not a problem and was a major factor in its quick resolution. The stolen article had pictures of Marks personal automobile with Florida tags sitting in front of well-established palm trees. His full name was mentioned in the article along with some local information. When the hosting company reviewed these unique items it was clear who generated the content.
Mark had some general best practices at the end of the call. He recommends taking action against stolen content as soon as possible. The longer the infringing material is up the harder it can be to get removed. Second be proactive in protecting your copyrighted material and have a plan in place to discover content that has been scraped, copied and posted. Last but not least the more unique and personal the content the easier it is to prove that it is truly yours. When possible include details that are unique to you and your brand. These can be pictures, local information or just insider stories that only you can provide.
Have you had this experience with stolen website content? If so, please tell us your story in the comments below, or email us at: donna@intouchpromotions.com. We’d like to share your story too.
Are you new to Google+ and have a personal profile but now want to create a Google+ business page to help promote your brand or store? I have found that sometimes it’s not so easy to get answers to simple questions like this on Google+. Here is your One Minute Tip to help you get started right now setting up a Google Plus page for your business or nonprofit.
Note: you have to have a Google+ personal profile before you can create a Google+ business page.
First things first: Get to your Google+ profile
First, go to your personal Google+ profile. To do that, click here and you should be taken directly to your profile if you’re signed in.
Alternatively, type “Google+” into your browser’s search bar. If you’re already signed in to Google, you should see the link for your Google+ profile in the upper left-hand corner of your browser. Click on it (fig. 1).
fig. 1: Click on +Your Name in the upper left-hand corner of your browser to access Google+.
If Google+ takes you to a “get started” page and tries to “help” you find friends and connections to circle, just keep hitting the “continue” button at the bottom right, then hit the “Finish” button and Google will take you to your G+ profile.
If you’re not already signed in to Google+, either click here or hit one of the https://www.plus.google.com links that show up in the search results and you will be prompted to sign up or sign in.
Now to create a Google+ business page
Now that you’re in your profile, gaining access to the area where you can create a G+ business page is easy. On the left side of your page, you’ll see a column of icons. Hover over the “More” icon at the bottom left. You will see, greyed out, three more icons to the right of the “More” icon: one for Circles, one for Games, and one for Pages. As you hover over each of those, you’ll notice they turn colorful. Click on the “Pages” icon (fig. 2):
fig. 2: Hover over “More,” then “Pages,” then click on “Pages” to get to the tab where you can start a Google+ biz page.
If you haven’t yet created a Google+ business page, you’ll get the friendly reminder that you haven’t yet created a page, along with the icon in the upper right hand corner to “Create new page.” If you have already created a page or two, you’ll see those pages listed and get the same icon to “Create new page.” Click on that icon and you’re good to go (fig. 3).
fig. 3: The “Create new page” icon is in the upper right corner. Click and create!
Switch back and forth between your Google+ pages
One final tip: you can easily switch back and forth between your Google+ personal profile and business page(s). Click on your name in the upper right hand corner of your Google+ page. A drop-down box appears with your page(s) listed below your personal profile. Click on the page you wish to switch to (fig. 4).
fig. 4: To get from your G+ personal to biz page, click on your name in the upper right corner. Make sure you’re signed in to Google+ first.
Don’t forget to leave your Google+ business page link in the comments below so I can circle you and follow your posts!
Donna Saliter, In Touch Promotions, One Minute Tips
Here at In Touch Promotions, sometimes I find something funny, but I don’t necessarily Laugh Out Loud (lol). I Chuckle Out Loud (col). The meaning of “col” is Chuckling Out Loud (grin).
With the new Facebook Business Timeline, you may have heard, your Facebook cover photo is not allowed to contain certain things. You are not allowed to put your website, phone number, or call to action in the cover photo.
Starting to feel like a teenager with a curfew? Don’t worry: here’s a One Minute Tip on how to get your name out there on top of your Facebook business Timeline anyway.
First you should review the actual rules like any good teenager about to blow their curfew. Below is Facebook’s cover photo policy.
“Cover photos (on the Business Timeline) cannot include:
A. Price or purchase information, such as “40% off” or “Download it at our website”.
B. Contact information such as a website address, email, mailing address, or information that should go in your Page’s “About” section.
C. References to Facebook features or actions, such as “Like” or “Share” or an arrow pointing from the cover photo to any of these features.
D. Calls to action, such as “Get it now” or “Tell your friends”.
Covers must not be false, deceptive or misleading, and must not infringe on third parties’ intellectual property.”
You can download Facebook’s policy and other information here. Scroll down to the bottom of that page and where you see “Top help center questions,” click on the “Where can I learn more about how to use the new Pages?” It’s the”Pages Product Guide” pdf file.
So, what can you do so that you don’t lose your call to action, yet stay within Facebook cover photo guidelines for your Business Timeline?
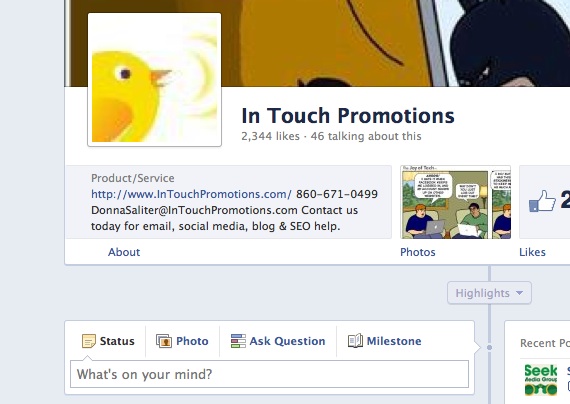
Rewrite your “About” section. Up to 146 characters will be visible on your Timeline, directly underneath your business name and cover photo. So put your website, phone number, email, call to action – anything you want into this section. For your entire message to be seen on your page, keep it within the 146-character limit.
The easiest way to edit this section is to click on the “About” link just below your company name and description, as seen in the above photo.
Once on the info page, hover your cursor to the right of the “About” section, and click “edit.” This will take you to the edit page. Once in the edit page, put your new message in the “About” field. Scroll down and hit “Save.” Make sure Facebook gives you the “Information Updated” message at the top of the page before clicking on the “View Page” button on the upper right corner.
To see an example of how this new About area can work for your business Timeline, visit In Touch Promotions’ Facebook page. Let us know what you think!
Do you have any tips to share about Facebook business Timeline or cover photo? Please let us know in the comments below.
Links to other coolly Facebook Cover Photo Articles
Now that you have the new “Timeline,” have you gotten a chance to play around with your new Facebook cover photo? You can upload all kinds of photos and make them look big and beautiful. I’ve seen some incredible images – many of them from photos that my Facebook friends take. But some of these fantastic photos are from gallery sites. There are some awesome gallery sites that offer free Facebook cover photos. You can have a lot of fun perusing these free cover photo sources.
The gallery sites listed below offer free beautiful cover photos specially designed and sized for the Facebook Timeline. So have some fun and choose a great Facebook cover that fits your personality!
Free Facebook Cover Photo Gallery Sites
Fook Cover – Cutting-edge artists crafted these hand-picked creative works that make this site our top pick for stunning and extraordinarily artistic Facebook cover photos.
fookcover is a Facebook Cover photo gallery site where you can get a free Facebook cover
* * *
facebook.coversdaddy – Need volume to have fun with your cover photo? Check out over 1400 fabulous pictures to choose from our top gallery pick for selection and quality.
CoverDaddy adds humor to your Facebook cover photo
* * *
Myprofilecover – This gallery site is different because it is filled with photos designed by a team of graphic and web designers who have put together original artwork – with a little extra “Awesomeness” – specifically for Timeline covers.
You can get graphic and web designer creativity for your cover photo from MyProfile
* * *
fcoverphotos – Are you spaced out and want that reflected in your Facebook cover? Here are unique and unusual covers from over 20 categories including world, planes, 3D, air crafts, motorcycles and computers.
Give your FB friends unique perspective in your cover photo with fcoverphotos
* * *
trendycovers – Send a message to one and all with thousands of timeline Facebook covers that are updated daily. No matter what your mood, TrendyCovers has got you covered.
Your Facebook Cover can "tell it like it is" with TrendyCovers
* * *
FB Cover Pix – Upload, explore and share cover photos. Site has an excellent getting started page with a great video.
If you need instructional video to upload a Facebook cover photo, use fb-cover-px
* * *
If you’re ready for even more fun try one of the gallery sites that feature super simple cover photo generators in addition to a great selection of stock covers. Tip: desktop wallpapers can make a great cover photo.
CoverJunction – Choose from high-quality cover photos that other users create and share. Or use CoverJunction’s simple 3-step cover creator to create your own cover photo. They have 2 personalized cover creation options to help you easily do the creating.
FB Profile Covers – How’d you like to make a collage of photos for your cover photo? If you’re looking for a vast selection of premier photos this gallery includes a Profile photo “Collage Cover Maker” with several templates. And it comes with a bonus – your finished collage cover photo won’t have any watermarks.
FirstCovers.com – Select from 50 categories with thousand of pictures to choose from. Create a cover with their easy cover makers: collage, quote, Polaroid, scrapbook, heart, kissing booth, original, and name. The advanced cover maker combines the features of all the generators. Our pick for best online creator.
Ready for more creative tools to make your Facebook Timeline Cover photo? Look to our coming series featuring our top pick online Cover Maker Generators. To get you going in a flash creating covers the posts will include how-to-step-by-step tutorials.
Did you create your Facebook fan page and now you don’t want it anymore? Maybe you started over from scratch and your new page is so much better, so you don’t need the old one anymore. Here’s a simple one minute tip on how to delete Facebook business pages.
First, go to the business page you want to delete. To do that, go to your personal profile, click on the upper right-hand drop down arrow next to the “Home” link. Click on the page you would like to delete.
Once in that page, click on “Edit Page” in the upper right-hand of the page.
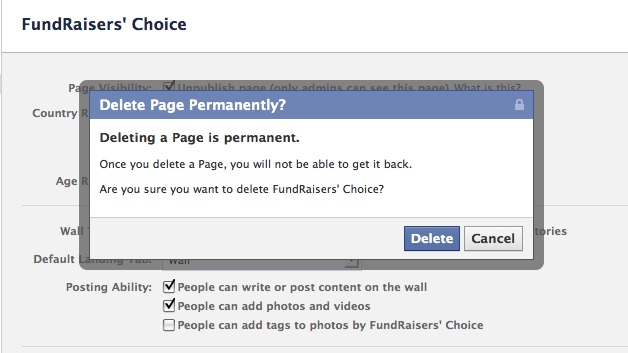
Then hit “Manage Permissions,” the second link on the left side of the Edit Page page. Right above the bottom “Save Changes” button, you will see a “Delete Page” link. Click on it.
A box will pop up that asks: “Delete page permanently?” Click “Delete.”
Another pop up will say, “Page permanently deleted” and you will have successfully deleted a Facebook business page.
What other Facebook questions do you have? Let us know in the comments below and we’ll be sure to find the answers for you!
Did you fall for that “See who’s viewing your profile” scam? Awww, we warned you against that! You couldn’t resist though, could you? And who can blame you? Who doesn’t want to know who’s been stalking their profile? If you’ve clicked on a Facebook rogue app from your News Feed, it will access your Facebook profile. Here’s a One Minute Tip on how to remove an application from Facebook.
If you’ve accessed a rogue app/virus in Facebook you need to 1.) remove the application (app) from your Facebook profile, 2.) change your password! and 3.) you may have to cancel that ongoing SMS “service” that will be billed to your cell phone at several dollars for every text message received, if you inadvertently signed yourself up for that rogue service. You may also have to 4.) apologize to some people but we won’t get into that here.
I can help you with #1.) Here’s how to remove an application from Facebook.
Go to your “Home” page. It’s commonly called your News Feed. You get there by clicking on the “Home” link on the upper right corner of your Facebook page.
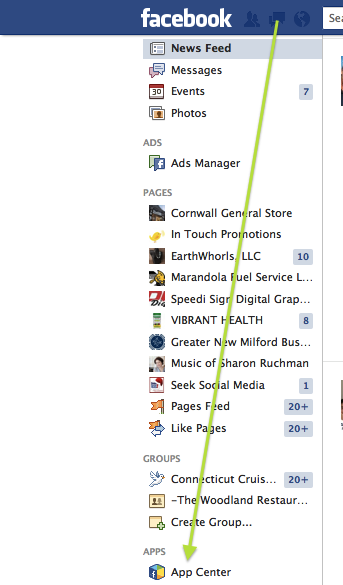
On the left side of your Home page, point your mouse over “APPS.” Just to the right, you’ll see “MORE.” Click on “MORE.”
You’ll see the list of apps, along with those beautiful pencil icons to the left of each app. Find the rogue app in question. Click on the pencil and you’ll see a list of three options. Click on Remove App.
You’ll be asked to confirm. Click “Remove” and the app will no longer have access to your profile. You have successfully removed an app from your Facebook profile.
Now you, too, can remove an application from Facebook!
To check whether a Facebook post is a rogue or virus before you click on and access it, go to Hoax-Slayer.com. They have lots of great information and cover most if not all of the Facebook viruses going around.
What’s the funniest hoax post you’ve seen on Facebook so far? Let us know in the comments below.
Looking for return readers to your site? Create a reoccurring feature section, just like popular magazines have. Post to this section regularly with new info and ideas to keep readers coming back for more.
Regular Feature Post Medium | Use Max times per week 2 | Interaction Index 4 (scale from 1 low-5 high)
A regular feature post is part of a collection of posts assigned to a reoccurring feature category. A popular regular feature increases both brand recognition and site subscriptions.
Headline: Combine your feature category name with your headline to brand your post: “Rick’s Tips: ….” or “One Minute Tips: …” “1031 Exchange of the Month…”
Intro: Ask the reader a question. Tell them how this post will offer a solution. Use a reoccurring catch phrase to enforce the brand.
Content:
Develop a “logo” style thumbnail for feature category.
Use a consistent visual styling for the posts in your feature category.
Keep the post similar in length and tone.
Conclusion: In addition to inviting readers to read more posts; invite readers to post on the same theme in their site with a link back to your original post.
Resources: Your favorite magazines, journals, news papers, and news/magazine TV shows regular features.
We have reach the end of our Blog Posts Made Easy Series. Make this the year you fill your blog with posts! We will be covering more writing and SEO tips this year, what would you like to know about in these subjects?